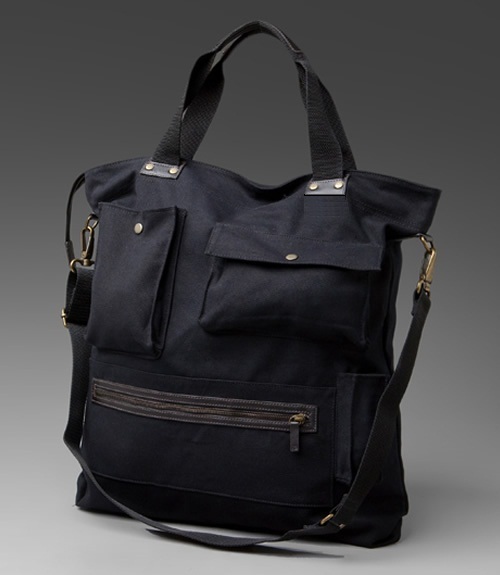
“multi-pocket urban tote”
Smart-looking yet functional in commuter bag designs. An urban carry-all with a variety of pocket compartments for wallet, cellphone and PC notebook makes it the perfect everyday tote. Carry in your hand, on your shoulder or across your chest.Dimensions: 17″ high / 15″ wide / 2″ deep with a 42″ [1.1 m] adjustable shoulder strap and exterior pockets. [43cm X 38cm X 5 cm]
Construction Method: Turned finish – this method may be recognized by noting the lack of machine-stitching that is visible at points of assembly on the exterior side of the bag. This is possible by placing the material, or parts, face to face, machining and turning right-side out. It is the most commonly used assembly process.
Material Used: 100% Olefin sueded automotive upholstery, 54″ [137 cm] wide; trimmed with PVC leatherette vinyl, 60″ [152 cm] wide.
You will need:
- 2 D-rings, 1” [25 mm] inner dia.
- 2 swivel clasps, 2” [50 mm] inner dia.
- 1 square slider buckle, 2” [50 mm] inner dia.
- 1 square bracket ring, 2” [50 mm] inner dia.
- 1 pocket zipper, 10” [26 mm] long
- 1 closed zipper, 14” [35 mm] long
- 1 closed zipper, 22” [56 cm] long
- 2 dome snaps, ½” [12 mm] dia.
- 12 rivets, ½” [12 mm] dia.
- 2½ yds. [2.3 m] webbing, 2” [50 mm] wide
- 1 spool upholstery thread
- 1.10 yds. [1 m] upholstery fabric, 54” [137 cm] wide
- ¼ yd. [0.25 m] vinyl leatherette, 60” [152 cm] wide
- 2 ½ yds. [2.3 m] of single-fold bias tape, ½-inch wide [12 mm]
- a small remnant of fusible interfacing
- 1 roll of kraft paper
PATTERN
This is a simple block design. Plot and cut block layout directly onto the fabric according to the measurements given (seam allowance is NOT included); OR draft onto kraft paper for a permanent hard-copy pattern.
 BODY PATTERN


** Add seam allowances to all pattern pieces.
CUTTING

- cut body of the bag on straight of grain (or cross-grain for railroaded fabric; for a directional pattern on straight-grain you will need to purchase additional yardage.)
- cut one of each pattern piece on straight grain
- cut 2 strap handles from webbing; each is 20” [51 cm] long.
- cut 1 short shoulder strap from webbing 15” [38 cm] long.
- cut 1 long shoulder strap from webbing 33” [84 cm] long.
- cut 2 rectangles from leatherette; each is 8” [20 cm] long and 3” [7.5 cm] wide.
- cut 4 tabs from leatherette; each tab is 2” [5 cm] long and 2” [5 cm] wide.
- cut 2 loops from leatherette; each loop is 4” [10 cm] long and 1” [2.5 cm] wide.
- cut 1 oblong from leatherette; it is 11” [28 cm] long and 1½” [4 cm] wide.
ASSEMBLY
- Make up shoulder strap pieces and D-ring loops. Place the bracket ring onto the short webbing strap piece and attach at one end. On the long strap piece, add a slider buckle and attach to one end. Add a swivel clasp at the open end of shoulder strap, then insert strapping through the slider and attach open end to the bracket ring on the shorter strap. Attach the remaining swivel clasp to the short strap section. Set aside.
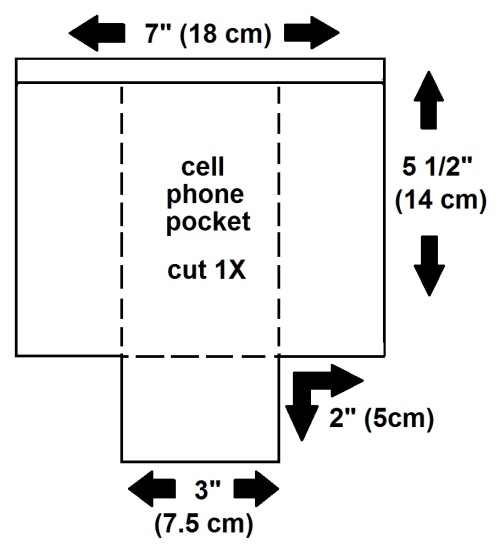
- Make exterior pockets. For the wallet, cell phone, and utility pockets, fold and miter lower corners of pocket pieces. Turn under the top edge of the pocket and press flat. Topstitch the top edge of pocket. For pockets with dome snaps, fuse a small piece of interfacing to back of fabric to accept the hardware in its placement position. Turn under the seam allowance along the sides and bottom of the pockets and press flat around perimeter of pockets. Set aside.
- For the envelope pocket, outline the zipper opening with stay-stitching and insert zipper. To hide the cut edges of the zipper opening, use the oblong strip cut from the leatherette as a frame around the zipper. Dry-fit the leatherette to the zipper opening and cut out a slot for the zipper and topstitch in place. Next, turn under the seam allowance on all sides of the pocket and press flat. Set aside.
- For pocket flap, fuse interfacing to back of fabric. With FACE SIDES together, fold flap in half lengthwise and sew up short ends. Grade and trim points; turn right-side-out and press flat. Set aside.
- For notebook pocket, press under top edge of pocket. Align and center zipper to top edge and topstitch in place. Turn under seam allowance along sides and bottom of pocket and press flat. Turn under seam allowance along perimeter of pocket and press flat. Set aside.
- For zipper flap, fuse interfacing to back of fabric. With FACE SIDES together, fold flap in half lengthwise and sew up short ends. Grade and trim points; turn right-side-out and press flat. Set aside.
- Do a Hong Kong finish to neaten all vertical seams of the main body section.
- Following the illustration, place each pocket to its location on the body section while it is still flat and edgestitch around the pockets. For pockets and flaps with dome snap closures, you will need to attach part of the “set” to the bag body or pocket prior to sewing the pocket in place. Reinforce the fabric at the connection point by fusing a small piece of interfacing to the location to stabilize the fabric for receiving the dome snap. Follow manufacturer’s direction for installation.
- Add a leatherette pull-tab to the end of the long zipper. With FACE SIDES together, fold the body section in half and insert long zipper to top edge of bag. The zipper will extend beyond the top edge of the bag. (Remember to open zipper before stitching up bag as you will need to turn it right side out.)
- With FACE sides together, sew the vertical seams and press open. Then, align and match the side of the bag to its bottom. Sew from corner to corner to miter the seam. Bind the raw edge of this seam with bias tape and complete a Hong Kong seam finish. Turn body of the bag right-side out. Set aside.
- Cut the two strap pieces from the webbing. These will be the bag handles. Measure each handle strap to 20″ [51 cm] long. Center a rectangle of leatherette in the middle of the strap to form a handle and wrap it around the webbing. Fold the webbing widthwise and stitch down. Set aside.
- With FACE SIDE UP, turn under seam allowance along the top edge of the bag and press flat. Turn under 1” [25mm] to face the bag opening and topstitch in place around the opening.
- Sew the D-ring loops to each side seam just below the top facing stitching. Add rivets following manufacturer’s directions.
- Sew 2 leatherette tabs FACE DOWN to the edge of the bag opening (5” [12.5 cm] from the side seams) on the front and back on the bag opening. Sew through the middle of each tab. Place handle straps ends on top of a tab and secure in place. Fold the tab in half to encase the strap end and topstitch around the edge of the tab. Add rivets following manufacturer’s directions.
- Clip on swivel clasps to D-rings.
bagntell.wordpress.com


No comments:
Post a Comment